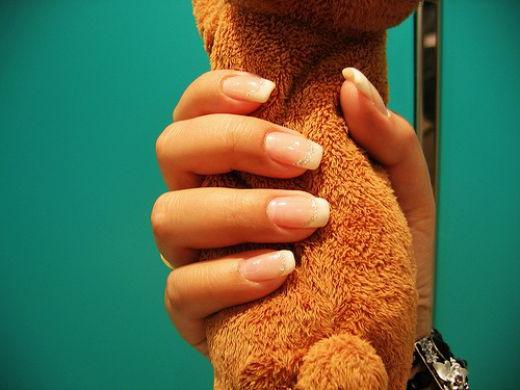
Nail extensions on forms
Nail extensions on forms are based onUse special plastic shapes that mimic the free edge of the nail. They are glued to the tip of a natural nail with the help of professional glue. You can give them any length and shape, make the necessary zapil and lay out the material.
Nail extensions on forms have manynuances, so it is better to entrust it to a specialist. If the procedure is not performed correctly, artificial nails will last very briefly. However, you can learn to do the build-up yourself, if you pre-practice a little and do everything very carefully.
Nail extensions on the upper forms areapproximately 40 minutes. Such forms are different from conventional types. To the upper forms, acrylic is not glued, because they have a perfectly flat surface from the inside. Thanks to this, the forms are easily separated from the nails and get shine without any special additional processing.
Forms are placed under the edge of a natural nailand become the basis for the formation of artificial nails. Forms can be paper based on glue (used once) or metal (reusable). Paper forms are easier to fit at will, they are designed for single use, and metal sterilized after each customer.
To build the nails on the forms, you will need acrylic, tweezers, brush, varnish, forms, antiseptic, fine and coarse-grained file, spray disinfector, polishing file.
Before the procedure, hands should be washed andtreat with a disinfectant. First, using a coarse-grained file, you need to remove the top glossy coating. The needle must be worked very carefully so as not to damage the cuticle. All movements of the nail file should be directed in one direction - in the direction of nail growth. The surface of the nails after this treatment should be perfectly even.
After that, the cuticle is peeled off. For this, it is necessary to carefully push it away from the nail. Gel for the cuticle is aged for about a minute. It's better not to do an edging manicure before building up
On prepared nails can begin to be applieda thin layer of primer with a brush, avoiding the composition on the skin. It is necessary to give the nail surface a shine. After this, the procedure begins directly - nail extensions on the forms.
Then the shape is taken, bent at the markedplaces and put on a finger. You need to place the shape under the corners of the nail and fix it on your finger, gently combining the ends. Another primer layer is applied. Take an acrylic ball and put it on the mold, distributed on its surface with a brush. After this, a brush dipped in liquidation forms a cut line of the nail, its sides and the base of the nail.
When the acrylic is completely dry (the process can bespeed up using a UV lamp), you can shoot the shape. Nails should be in the same shape as the natural ones. Particular attention in their treatment should be given to the zone of connection of your nail and artificial. To do this, put a little gel on the joint and from it stretch movements to the tip of the nail.
The cuticle is covered with a caring agent. Nails can be immediately covered with a clear varnish. You can also make nails with an ordinary varnish or create a pattern on them.
Important: Before performing the procedure, all used instruments must be disinfected, and the skin of the hands must be treated with an antiseptic.
Nail extensions on the forms can be carried out up toforty times using the same material every time. This material is elastic, high quality and allows you to work professionally. You can buy it in all the specialized stores.