All the ways, like in the "Word" make a red line
Everyone knows what a red line is. This is a small indent of the first line of the paragraph from the left edge to some distance to the right. But not everyone can make this indent in the program "Vord". In this article, we will just talk about how to make a red line in the Word. We will analyze all possible ways and tricks. Let's illustrate the stages of implementation of these actions. We will consider all versions of the program.
We make a red line in the newest versions of the program using the ruler
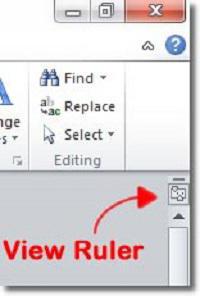
Now we will consider the first method, as in the "Word"make a red line. This method will consist in using a ruler in the program. By default, it is not enabled, so we will have to do it ourselves. To do this, go to the "View" tab and in the "Show" section, check the box next to "Ruler".

But it was not the only way, how canto include a ruler in the program. You can use the special button, which is located above the scroll bar. However, the last (2016) version of the program does not have this icon.
So, the ruler is on, you can watch it on top of the document under the toolbar. For the red line, this ruler is useful, the vertical one on the left can not be touched at all.
All preparations, before in the "Word" to make a red line, were made, now go directly to the process itself:
- On the ruler, you should observe two sliders on the left - we are interested in the upper one.
- Hold the left mouse button and start dragging it to the right. As you can see, the first line of the text also begins to shift.
Now you know how to make a red line in Word. But this is just the first way, now we go directly to the second.
Make a red line in the newest versions of the program using tabs
The second way may seem to someone a lotis easier than the first, because no preliminary manipulation will not be necessary. So, let's figure out how to make a red line in Word using tabs.

To put a tab, you must press the TAB key. Pre-position the cursor at the beginning of the first line of the paragraph, and when the key is pressed, a red line will appear.
This method is good because it performs quite wellquickly, but its disadvantage is that if there are a lot of paragraphs, a red line should be done on each one manually, and this can be delayed. Therefore, we turn to the third method - how to make the red lines in all paragraphs at once.
We make a red line in the newest versions of the program using the paragraph "Paragraph"
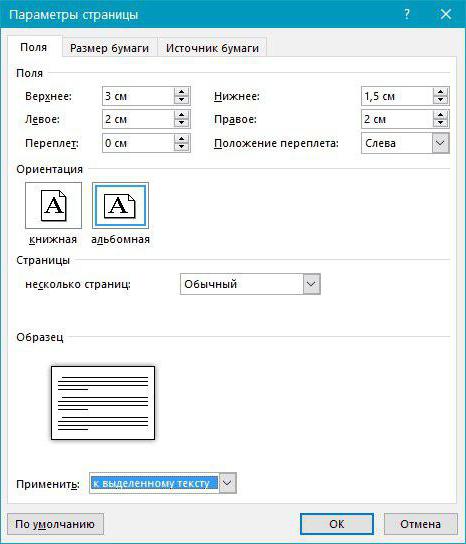
So, as you can understand from the subtitle,we will use the paragraph settings. But initially select the text where you want to indent. Next, click on the arrow in the "Paragraph" section, in the "Home" tab. Its location you can see in the image below.

Before you open the window. In it, pay attention to the section "Indent." On the right there is a drop-down list called "first line". Click on it, select Indent, and in the field to the right, enter its required value.
After you click "OK", your document will have a red line in all the paragraphs that have been highlighted.
Making the red line in the 2003 version
The red line in the "Word 2003" is absolutely identical, as in the above methods, but there is one nuance - differences in the interface. It is about them that we now talk.
For example, if you want to make a red line withUsing the "Paragraph" setting, you will not find the corresponding icon - it simply does not exist. And to call this menu, you need to select the formatted text area, then click on the menu to select "Paragraph" (further settings are done in the same way as in the examples above).

But to call a ruler, the instruction is similar. In the top panel, find "View", click on it and select "Ruler" in the context menu by ticking the box next to it. Then the actions are the same as in the examples above.