Check for errors on the hard disk. Hard disk check for errors, Windows 7
Often, unstable computer operation is associated witherrors in the HDD file system. To cope with this problem, it is necessary to check the errors on the hard disk. Among other things, it would be nice to know about the status of the hard drive, if during the work of the PC it makes strange sounds, such as clicks or grinding. If the hard disk drive information is received in advance, you can save all user data before the device fails.
Victoria
First of all, a specializedprogram. One of the best and most reliable is Victoria. With it, on any operating system, you can check the hard disk for errors. If you have Windows 7 installed, XP or 8, "Victoria" will work stably under each.
The application is absolutely free and can bedownloaded from the developer's site. In this case, it is distributed in two versions. The first is the standard binary packages for running in the OS. The second is the ISO image to run without the need to boot the operating system. This is convenient when Windows refuses to work due to HDD errors.
If the HDD has a capacity of about 700 GB, at leastOne or two hours will take a hard disk check for errors. Windows 7 will perform this procedure with built-in tools much faster. However, the quality of testing and the amount of data obtained with the help of "Victoria" will be incommensurably higher.
Testing
First, download the application. It is supplied in the archive. Extract it to any empty directory and double-click on the executable file. If the work is done in Windows 7 or 8, you need to right-click on the exe file, and then select "run as administrator" in the context menu.

Checking the hard disk for errors shouldstart with a few preparatory steps. After starting the program, go to the "Standart" tab. In the right part of it you can see all the drives that are in the computer. Select the HDD that you want to test. Then click on the "Passport" button. If there is no trouble, the name and model of the hard disk will appear at the bottom of the window.
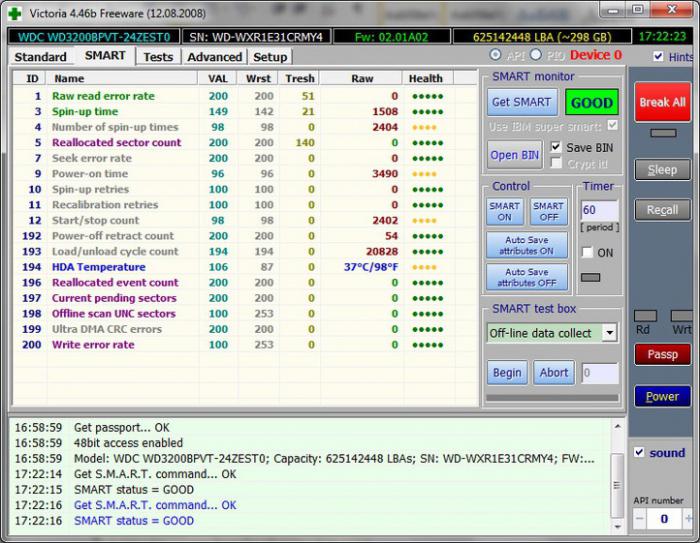
After that, go to the tab withname "SMART" and click on the inscription "GetSMART". If the status next to the button changes, then everything is done right. Usually in this area the word "GOOD" is displayed, but "BAD" may appear. Both in the first and in the second case, the sensor data is correctly read.
Possible mistakes
It happens that the HDD controller works in AHCI mode. In this case, the SMART attributes can not be read in any way, because the hard disk can not be checked for errors. The program will send the message "Error reading SMART" to the log. Also next to the button that is responsible for reading the data from the sensors, "Non ATA" will be displayed, and the area under the text will be highlighted in red.
To allow "Victoria" to work with toughyou need to change the BIOS settings. To enter them, you should press the "DEL" button several times while the very first messages appear on the screen when the computer is booted. The way to run the BIOS setup utility may differ for different motherboard models. If the "DEL" key does not lead to a positive result, it is worth to familiarize yourself with information that is easy to find on the developer's website.
After logging on to the BIOS, go to Config(can be Advanced) - Serial ATA - Controller Mode, and then change the parameter to Compatibility. Remember that after the hard drive has been verified, the settings should be restored to their original state.
Continued verification
After correctly reading SMART informationClick the "Test" tab and click "Start". After that, the error check on the hard disk will begin. In the main area of the program, rectangles that were previously monochrome will be painted in different colors. On the right, the total number of sectors sorted by access time will be written.

The main attention should be paid to the numbers nearblue and red marks. They are marked by dead or broken sectors. That is, those that can not be accessed, or take a very long time to read them. Thus, when you turn to them, the computer hangs.
Recovery
To try to restore bad sectors,the error check on the hard disk should be started again, but now set the switch from the bottom right to the "remap" position. The program will mark "badges" as non-working, putting their addresses in a special area on the HDD.
Be carefull! If bad sectors start to appear on the hard disk, the drive will likely continue to "crash" after recovery. It is desirable to replace it or at least make a backup copy of all important data by copying them outside the HDD.
Built-in tools
The built-in OS tools can also be used to check the hard disk for errors. Windows 8 allows you to run it in a few clicks.

- First open the explorer by clicking on the "My Computer" icon.
- Then right click on any section and select "Properties".
- Go to the tab labeled "Tools", and click on "Run verification" in it.

- A window will appear on the screen in which it is desirable to put both possible checkboxes.
- Click the "Start" button.

- HDD can not always be checked by built-inmeans of the operating system during its operation. In this case, Windows will ask the user if it is worth doing the procedure after the reboot. Simply click on the "Schedule scan," and then restart the computer.
- The report lines will appear on the screen at a timethe time when the hard disk is checked for errors. Windows 7, the program in which it is running, uses the same testing tools as in the graphical mode, but the information about the process produces incomparably more. In this case, you can see which files are recovered and what errors are found.
Checking the hard disk for errors through the command line
The command line is a powerful tool thatIt is used by many system administrators when solving various system problems. Its main advantage - the launch of testing, even when the graphical shell refuses to run. In this case, you should use "safe mode with command line support" by pressing the F8 key while Windows is loading, but before the logo is displayed on the screen.

If the standard mode is working properly, follow these steps to start the test:
- Press the "Windows + R" combination on the computer keyboard.
- Type "cmd.exe" in the entry line of the window that opens and click "OK".
- A command line appears on the screen. To run the test, write "chkdskX: / f / r" into it. Instead of the letter "X", click the one that is used in the operating system to indicate the section that requires testing.
- After you enter the OS, you can refer not to the impossibilityperform the procedure without necessarily restarting the PC. When the message appears, just press the "Y" key and restart the computer. After that, the error check on the hard disk will start automatically.
Remember: when performing an HDD check, you should wait for it to finish. This process can only be turned off by means built into the program. If you can not stop the procedure, do not try to interrupt it by turning off the computer or pressing "RESET". These actions can lead to additional errors and data corruption on the hard drive. The most dangerous is the impossibility of recovering information after an incorrect completion of work.