Yota: internet setting, automatic and manual
Very young, but already conquered heartsmany users, the mobile operator Yota continues its march across the country and is gaining in its ranks more and more users, tired of paying fabulous sums to the "big three". Yota offers absolutely unlimited access to the network, a package of minutes and endless SMS for more than a democratic price (from 300 rubles).
There is a small error in the operator. Despite the use of modern technologies and capabilities, SIM cards do not always want to be activated properly. This is one of those things that you will have to reconcile by connecting to Yota. Internet setup does not take much time, even in manual mode.

Preparing for connection
Initially, even before the acquisition of the SIM card, you should make sure of a number of facts:
- Your device supports networks: from the second (2G) to the fourth generation (LTE).
- On the coverage map there is your local community, and Yota supports work in your area.
If there are no problems with these points, then you canproceed with the activation itself. To do this, you just need to install the SIM card in your mobile phone or tablet and turn off the connection to the Wi-Fi (yes, the activation takes place over the mobile network). To manage your account, pay, and so on, you should download the official Yota application (Internet settings on your phone must be strictly in its presence), it will help with activation and setting of the tariff.
If the network does not appear after the operation, you should restart the device. Even if this did not help, you must enter the settings manually.
Another: the SIM card can be purchased anywhere, but it should only be activated where you plan to operate it.
Internet settings for Yota on iOS
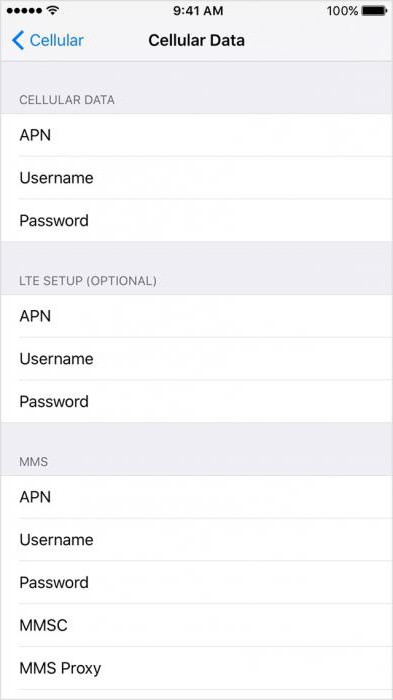
Under manual network setting is meantIntroduction of APN data in the phone settings. This procedure is necessary in cases where the phone can not receive this data on its own. So, in the case of iOS, you need:
- Go to Settings> Cellular> Data settings> Cellular data network.
- Here in the "Cellular data" we enter APN - internet.yota (other fields are left empty, this is important).
- To configure MMS, you need to go down a little bit lower and specify the following in the corresponding item:
- APN - mms.yota;
- MMSC - http: // mmsc: 8002;
- MMS - proxy - 10.10.10.10:8080 (leave the remaining fields empty).
Most often, this fine-tuning is required on the tablets, phones, in turn, cope automatically, but in which case these settings are suitable for the iPhone.
Setting up the Internet Yota on "Android"
There is no basic difference in the settings for these two platforms, in most cases it's enough just to download the Yota application and turn off Wi-Fi, if you need manual tuning, then we go further:
- Go to Settings> More> Mobile Network>Access points> Edit / create access point "(the names of items can vary from time to time, it all depends on the version of the operating system, and sometimes on the shell used).
- To configure APN, you must specify two parameters: APN - internet.yota and APN Type - default, supl.
- To configure MMS, we provide the following data:
- APN - mms.yota;
- MMSC - http: // mmsc: 8002;
- MMS - proxy - 10.10.10.10;
- The MMS port is 8080;
- APN Type - mms.
After you enter the data, you must restart the device. If everything is true, then the SIM card should be activated, and the Internet should be operational.

Yota modem setup
In addition to SIM cards, Yota also deals withselling all kinds of routers and modems. They allow you to go online using a laptop or computer (device for one user). Router can also create an impromptu Wi-Fi-structure, based on 4G-networks Yota. This network is available to anyone who knows the password from it (multi-user version).
In most cases, there should be enoughautomatic configuration and activation of Yota. Internet setup on the peripheral device is the same as in the case of the SIM card: once you connect the modem to a computer or laptop, it automatically enters all the data and sends you to the official site. On the site you will be asked to fill out a profile, and also enter a confirmation code (it will come in SMS, to the number that was indicated at registration).

Configuring an Access Point
It is not exactly known why, but Yota, likesome other operators, block one of the most important functions of smartphones, namely the ability to share the Internet. We can assume that this function is hidden in connection with the cheap tariffs (the user can refuse to buy a modem or a router in favor of distributing the Internet from the phone). Benefit users do not necessarily have to tolerate such a controversial policy. How to fix this unpleasant feature of Yota? Setting up the Internet and APN to help us, consider the example of iOS:
- To get started, go to Settings> Cellular> Data settings> Cellular data network.
- We are looking for below the item "Modem mode". Enter the following parameters:
- APN - internet.
- The user name is gdata.
- The password is gdata.
- After that, you should wait a little or reboot the device.
At the moment this method remains the mosteasy to use and does not require the purchase of additional devices from Yota. Setting up the Internet and APN manually will be cheaper and will save you from having to carry another gadget with you.
conclusions
As you can see, the Yota Internet settings will not takea lot of time, and even a beginner in computers and smartphones can easily cope with them. Moreover, even serious problems like lack of modem mode can be solved by a couple of clicks within two minutes. After that you will be able to fully enjoy the truly unlimited Internet.