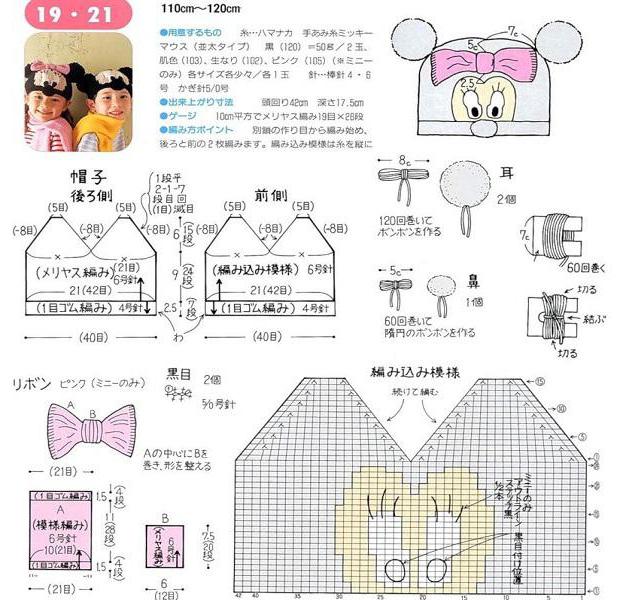
Crochet "Minnie Mouse" crochet: a diagram with a description
Even the smallest women like to flirt andwant to be real beauties. That's why all girls like bright colors and unusual design, even if it's a headpiece. Interestingly looks Minnie Mouse's cap, crocheted bound. It will be a great gift for the little girl who loves Disney mice. How to link it with your own hands, let's consider in the article.

Necessary materials
What will it take to connect this wonderful hat?
- Black or gray yarn.
- Red or pink yarn.
- Beige yarn.
- White yarn.
- Hook.
- Threads in color for stitching parts.
- Needle.
- Synthepone for stuffing parts (optional).
- Beads or buttons (on request for decorating the cap).
Recommendations for knitting
In fact, it's very easy to knit a Minnie Mouse capcrocheted. The charts and description are so simple that even a novice needlewoman can cope with them. The product is executed without tearing off in a circle by usual columns. In addition to the cap itself, you need to tie up big ears and a bright bow in the white peas. They are the distinguishing features of the charming Minnie Mouse.
For the summer version of the modelki fit linen,silk or cotton yarn. And the binding should be loose - columns with a crochet. For the winter cap is recommended to take the thread with the addition of wool. You can also tie the inside or sew a warm lining. The canvas should be made dense, for this purpose, the pillars without a crochet are best.
Variants of patterns for knitting caps are very many. Beginners can stop on the most simple posts. Experienced craftsmen probably want to stop on the more interesting performance of the Minnie Mouse crochet hook. Photos in this article for an example will demonstrate several patterns. But you can choose any one for your taste, both for the hood itself, and for the rest of the details.

We'll start knitting the very cap. It will be, rather, a summer variant, since the main product will be performed with columns with a crochet.
The base of the Minnie's cap
On the hook, we type five loops. The closed chain is closed with a connecting post. The first row should be performed with columns with a crochet. And in both walls it is better to tie two loops each. Thanks to this reception, the product will not be folded. The following two rows are executed in exactly the same way. At the beginning of each row, do not forget to make two air loops for lifting, and at the end - a connecting post. This will make the pattern not spiral, and the fabric will not be tightened.
In the following ranks, the additions are made less often - alreadythrough four to five loops. The older the girl, the more the top of the cap should be. On the average, in total, you need to tie a string with a crochet seven-eight rows. After that, the additions stop. Now each loop should be tied one column at a time. This will make the child's cap Minnie Mouse strictly in the shape of the child's head. So we knit the ranks until you reach the middle of the forehead of the baby.
Bezel edging
Now cut the thread and attach the yarnpink or red. We proceed to the very pattern, which resembles a fan. From the hook we count the third loop, we put four bars with a crochet into it. We repeat the actions to the end of the series. We fasten the connecting post.

The second row is similar. Only it is necessary to watch, that the columns were located between the bottom elements ("fans"). The remaining rows must be knit by the same principle as the second row. Top posts ("fans") should be strictly between the lower ones. Rows need to be tied so much that the edge of the cap reaches the eyebrow level of the girl. On this knitting, the crocheted caps of the Minnie Mouse crochet will be finished.
Mouse Ears
With this method of knitting the ears will not workperfectly round, but will be very similar to mouse. So, we type five loops of black yarn and put them in a ring. Knitting will occur spirally in columns without a crochet. In the first and second rows, the addition should be done in each loop, then - even less often, after three or four loops. So you need to knit until the circle around the diameter is the size of a woman's palm.
Now rows of columns without a crochet need to knitin the usual way, without adding or subtracting. Thanks to this, the canvas starts to fold. We fold the eye twice to determine the points of the fold. In these places, when tying the next series, you will need to do one drop each. This is to ensure that the part has a rounded shape. So we knit until there is a narrow hole left. But it should not be too small, otherwise it will be inconvenient to sew to the base. Similarly, you need to tie one more ear.

Another version of the ears
Someone will be easier to knit ears by the principlesimple circle. To do this, any scheme is suitable. Crochet Minnie Mouse crochet will not be any worse. For each eye you need to tie two circles together. That is, there will be only four identical parts. Knit is better than yarn in two pieces, so that the ears do not fall. For the volume inside you can put a little sintepon.
To connect parts of the ears, you need columns without a crochetin a circle, but not to the very end. This is done so that you can expand the details by about a centimeter and sew them to the cap separately. Due to this connection, the ears do not roll forward or backward, but they will hold steady all the time.
The face of the mouse Minnie
If desired, you can connect not only the ears, but also the face of Minnie Mouse. It consists of several parts, which are knit separately. This is the beige part of the face, eyes and nose.
Let's start knitting from the base. We type sixteen loops of beige yarn. We chain fifteen columns on the chain without a crochet. In the last loop - three bars. On the other side of the chain, we also knit fifteen columns. Now we turn the product and make six more rows in exactly the same way. In places of bending, you need to tie three posts in one loop. Perhaps the number of rows will have to be reduced or increased, so periodically try on the detail to the Minnie Mouse cap. Hook the edges when the base is finished.
Eyes and a nose of a mouse
Now let's move to the eyes. White yarn on the hook to collect six loops. On the chain to tie a row of columns with a crochet. In the extreme loops you need to make an increase in five columns. The second row is similar. Only in each loop there should be two bars. Pupils are made in the same way as a black thread, but smaller in size.
The nose is a regular ball. You can tie a bead of suitable size. But to make it from scratch is very easy. In order not to form an ugly seam, it is better to knit in a spiral. In the first three rows there must be an addition. These are six bars that need to be distributed evenly. The fourth and fifth rows remain without additions. Further downs are made - this is minus six bars. It remains to fill the sintepon ball and draw the thread.
In principle, for the children's cap crochet Minnie Mouse enough to tie one eye to make it look original and unusual. Basis and spout do not necessarily.
Bow for Minnie
On the hook dial about ten loops and three morefor lifting. Knit a row with double crochets. This will be the width of the bow. Next, you need to knit such a number of rows to suit you the length of the ribbon. Sew the ends together and turn them inside out. The jumper for the bow fits in a similar way, only smaller. Place it in the middle of the ribbon and now sew its tips.

Ready bow is not necessary to sew to the capMinnie Mouse crocheted. You can make it removable on a pin. This will allow you to further adjust the size of the cap, if you pin the bow on top, grabbing a part of the crown.
Mugs for a bow
White peas on a bright bow - this isMinnie's distinctive feature, so they must be. Light yarn on the hook, we collect four loops and close the loop. We knit seven double crochets and fasten the thread. One row will be enough. Such circles need to be connected from six to eight pieces. You can also decorate them with a red (pink) edging hats. Then the peas will need twice as much.
White knitted circles can be easily replaced with buttons, beads, small pompons, sequins or large rhinestones.
Stapling Parts
In principle, this is the whole master class of Minnie's hats.Mouse hooked. It remains only to collect all the parts into one. If you knit a face, then we first collect it. Pupils sew to the white part of the eyes. We combine it with beige details for the face. On it we attach the nose. Threads can be made cilia to the eyes were more expressive, and her mouth. The resulting face sew on the cap above the edging.

Now sew the ears. Fold the cap in half to outline the place of the bend. Pinning him ears pins. You can attach them with connecting posts or sew with a needle.
White circles sew to the bow. We fasten it on the top of the cap in the middle. The bow can be sewn with the ears so that they hold better. That's all, the wonderful headdress for the girl is ready.
Now you know how to knit a Minnie Mouse hat.crochet. It will be a great gift for a little fashionista for any occasion. If you remove the bright edging, bow, and make ears bigger, you get a great hat for the boy, stylized Mickey Mouse.